
Why a plough won't go into the ground, and how to set it up
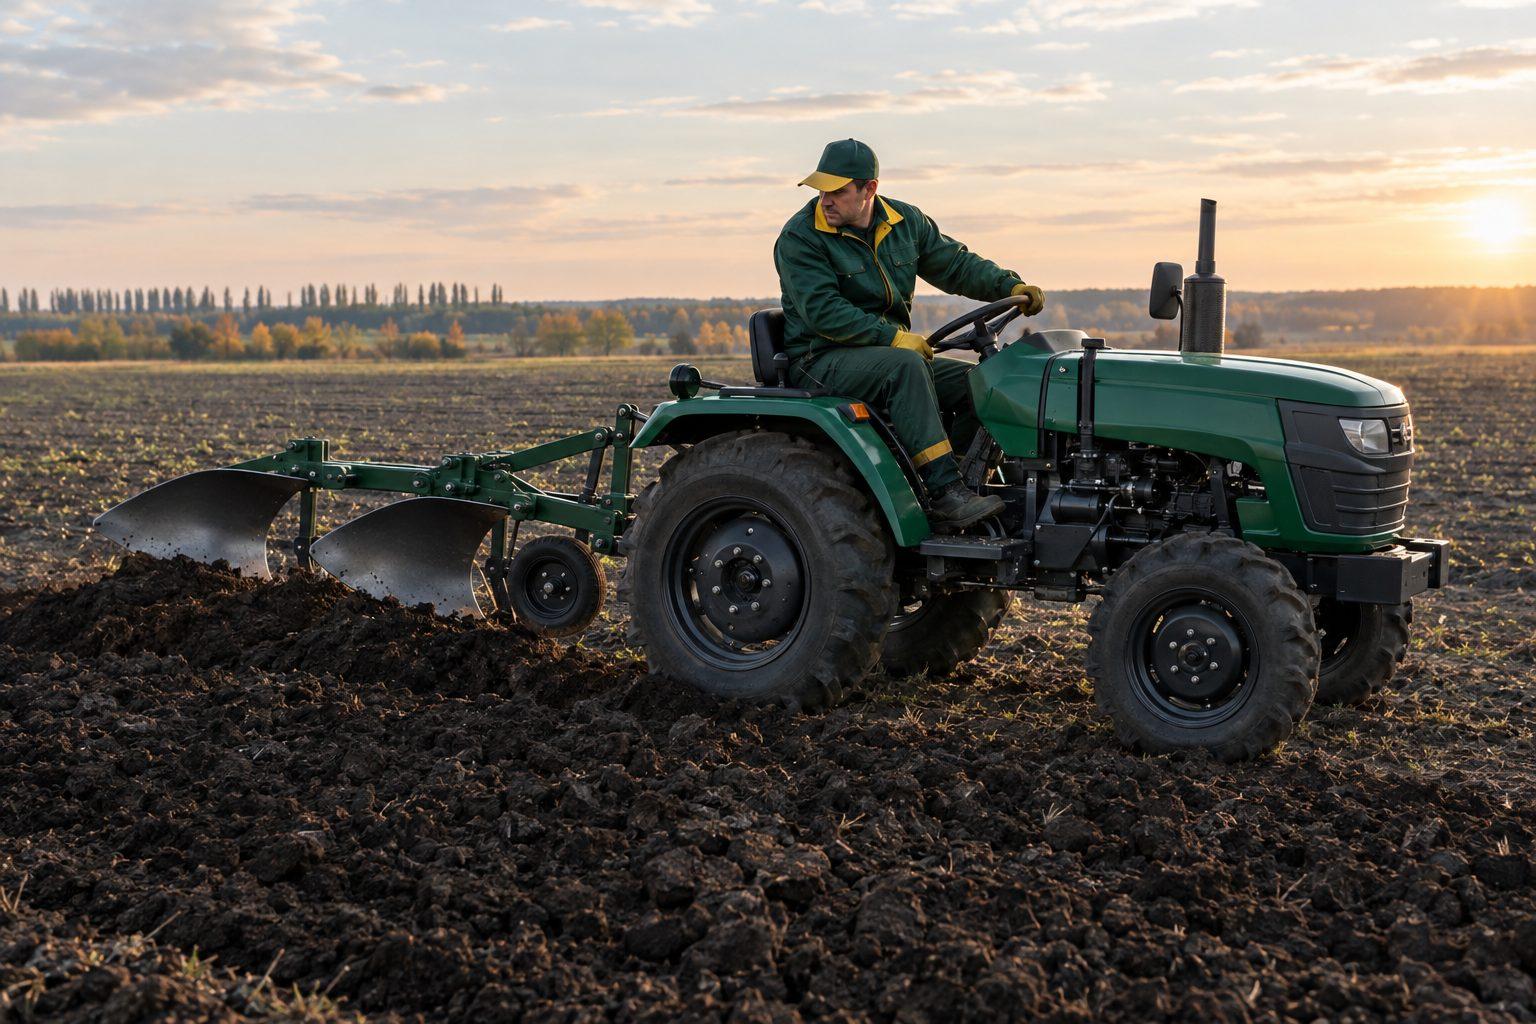
Why a plough won't go in, and how to set it up: a block under the left wheels, the gauge wheel, top link, right lift rod, skimmers, skew and the PLN-3-35.
A blunt share, long top link or high-set gauge wheel can stop a mounted plough going in. Set up on level ground: left wheels on a block of ploughing depth, as the right run in the furrow, the gauge wheel 1-2 cm lower, the frame levelled with the right lift rod and top link.
Why a plough won't go into the ground
First check the plough on level ground: is the frame level, and do all the share points touch? Then find the sign in the table: the cause lies in the top link, the shares, the gauge wheel or the soil:
| Sign | Cause | What to do | Source |
|---|---|---|---|
| The plough skids over hard ground | A blunt or worn share with no gap under its back | Sharpen or replace the share | South West Farmer; Uman guide |
| Front body runs out, the heel marks the furrow bottom | Top link too long | Shorten the link | South West Farmer |
| All bodies run shallow | The gauge wheel holds the plough too high | Lower the frame with the wheel's screw | Uman guide; Kverneland |
| Bodies do not penetrate properly | Share angle | Change the angle, if the plough has that adjuster | Pöttinger manual |
| Hard, dry or stony ground | Conditions for other tools | A chisel-shaped share, a body with a sliding chisel point or a disc plough | Uman guide; TNAU (2016) |
Under the Uman National University of Horticulture guide (2020), the chisel-shaped share ensures the plough penetrates: its long nose is bent 10 mm down and to the left.
If the plough goes in, then comes out
A frame tilted back brings the plough up out of the ground (Kirovohrad National Technical University guide, 2015). A top link set too long does the same: the front body runs out and the heel marks the furrow bottom (South West Farmer). With a slotted top link, Kverneland advises the fixed hole in very hard ground.
The parts you will adjust
A plough undercuts the slice, crumbles and turns it, and drops it into the furrow. Everything below is about a plough on a tractor's three-point linkage; walk-behind tractor ploughs hitch differently. The tractor's hydraulic cylinder lifts the plough, and the plough lowers into work under its own weight (Kirovohrad guide, 2015).
| Part | What it does |
|---|---|
| Share | Undercuts the slice from below and sends it onto the mouldboard |
| Mouldboard | Shifts the slice sideways, crumbles it and turns it over into the furrow |
| Landside | Bears on the furrow bottom and wall and stops the body moving sideways; the rear landside carries a replaceable heel |
| Skimmer | Cuts a small slice from the field side, so the main body turns its slice better |
| Disc coulter | Cuts the slice in the vertical plane |
| Gauge wheel | Sets the depth with its screw mechanism |
| Lower links | Hold the plough by the pins of its headstock |
| Top link | Sets the frame's pitch, front to back |
| Lift rods | Carry the lift from the arms to the lower links; the right one levels the frame across |
| Check chains | Limit the lower links' sideways sway |
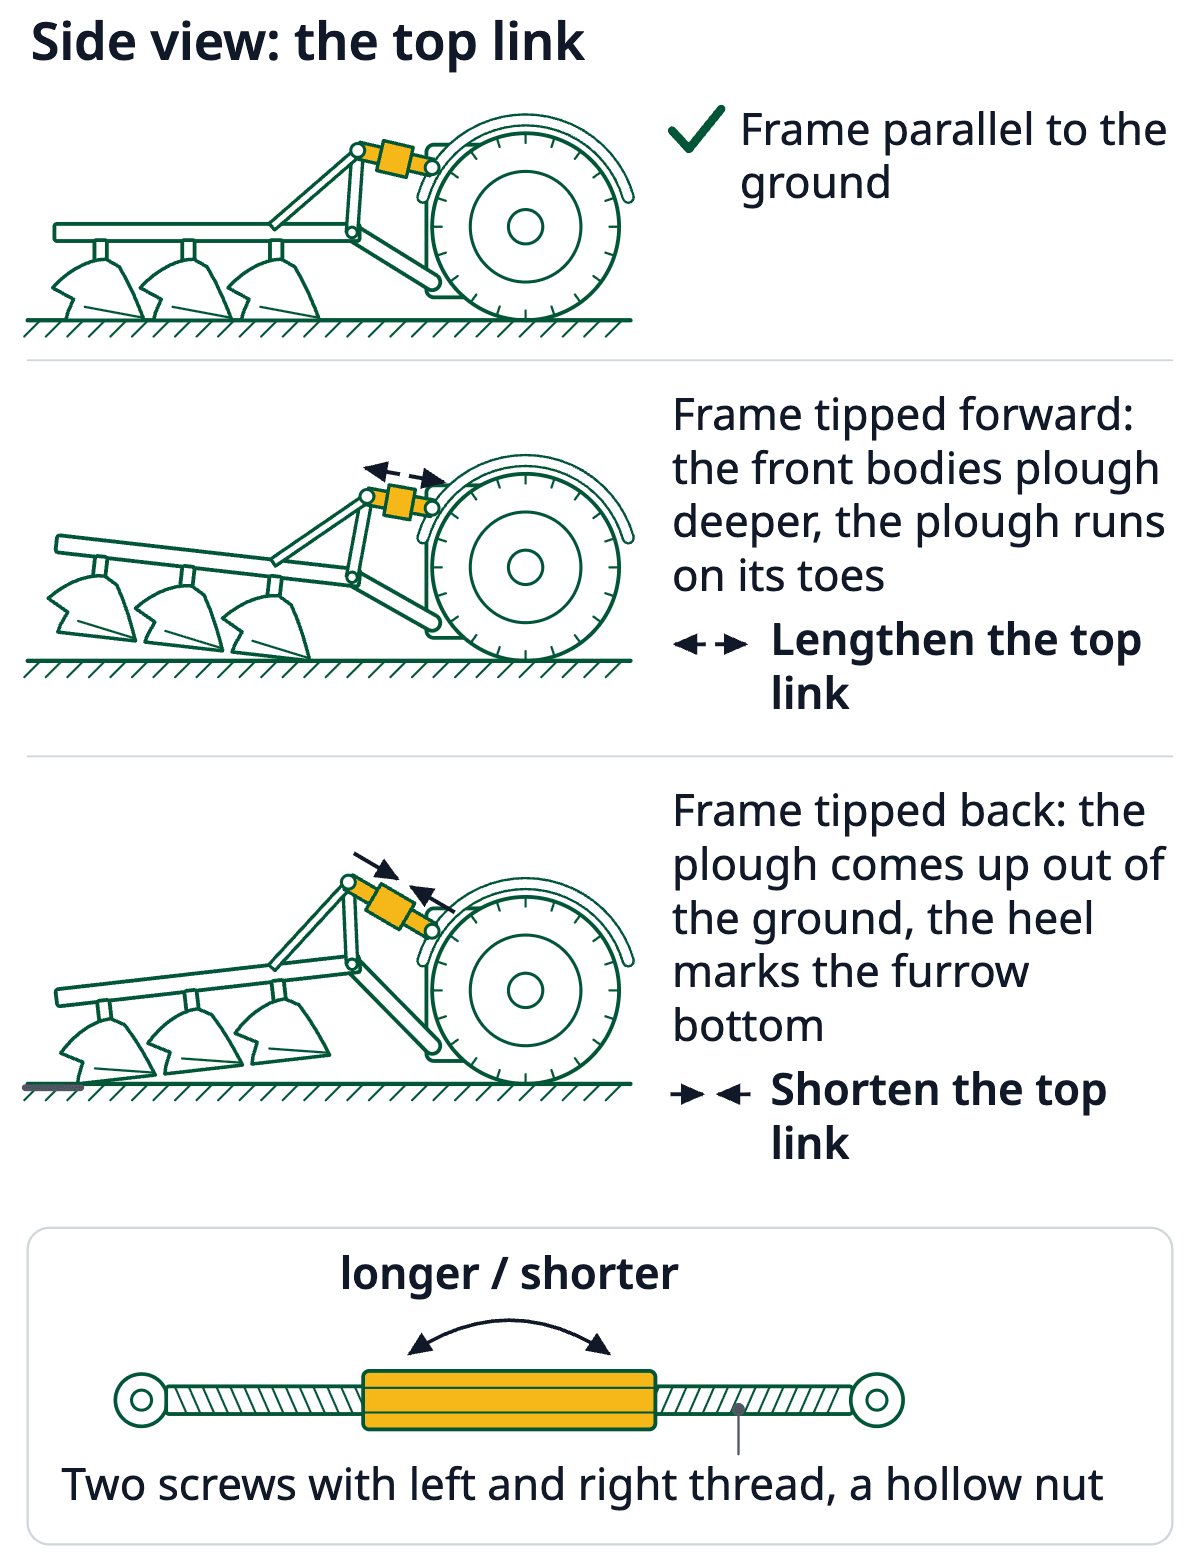
The top link is two screws, one with a left-hand thread and one with a right-hand thread, joined by a hollow nut: turn the nut and the link gets longer or shorter. The lift rods are built the same way (Kirovohrad guide, 2015). The parts of the body are described after the Uman guide (2020).
Before you go out: tyres, lift rods, shares
Tyre pressures on the same axle must match, above all with a reversible plough: in the furrow a softer tyre makes the tractor sit lower on one side (Kverneland, 2023). Set the left and right lift rods to the same length first. Take the rear wheel track and the skimmer depth from your plough's manual: different makers and sizes give different figures. Then check the plough against the Uman guide's limits (2020):
| What to check | Limit |
|---|---|
| Share points | in one line, within 5 mm (a string along the points) |
| Share edge | no thicker than 1 mm, bevel 5-7 mm, sharpening angle 25-40° |
| Bolt heads | flush with the surface or up to 1 mm below |
| Landside | 5-10 mm thick, 30-40 mm wide |
| Landside heel | no more than 5 mm towards the unploughed land |
| Disc coulter | end play on its axle up to 2 mm, fork play up to 3 mm, sharpening angle 20° |
Checking a new or rebuilt plough
After assembly, check how the bodies sit on the frame. Mark out the ground: lines lengthwise spaced at the body's working width (35 cm, for example) and lines across spaced at the distance between bodies (70 cm, for example). Stand the plough so the share points sit on the crossings. Where one does not, its position is corrected with shims, washers or straightening (Uman guide, 2020).
Depth on level ground: which wheels go on a block
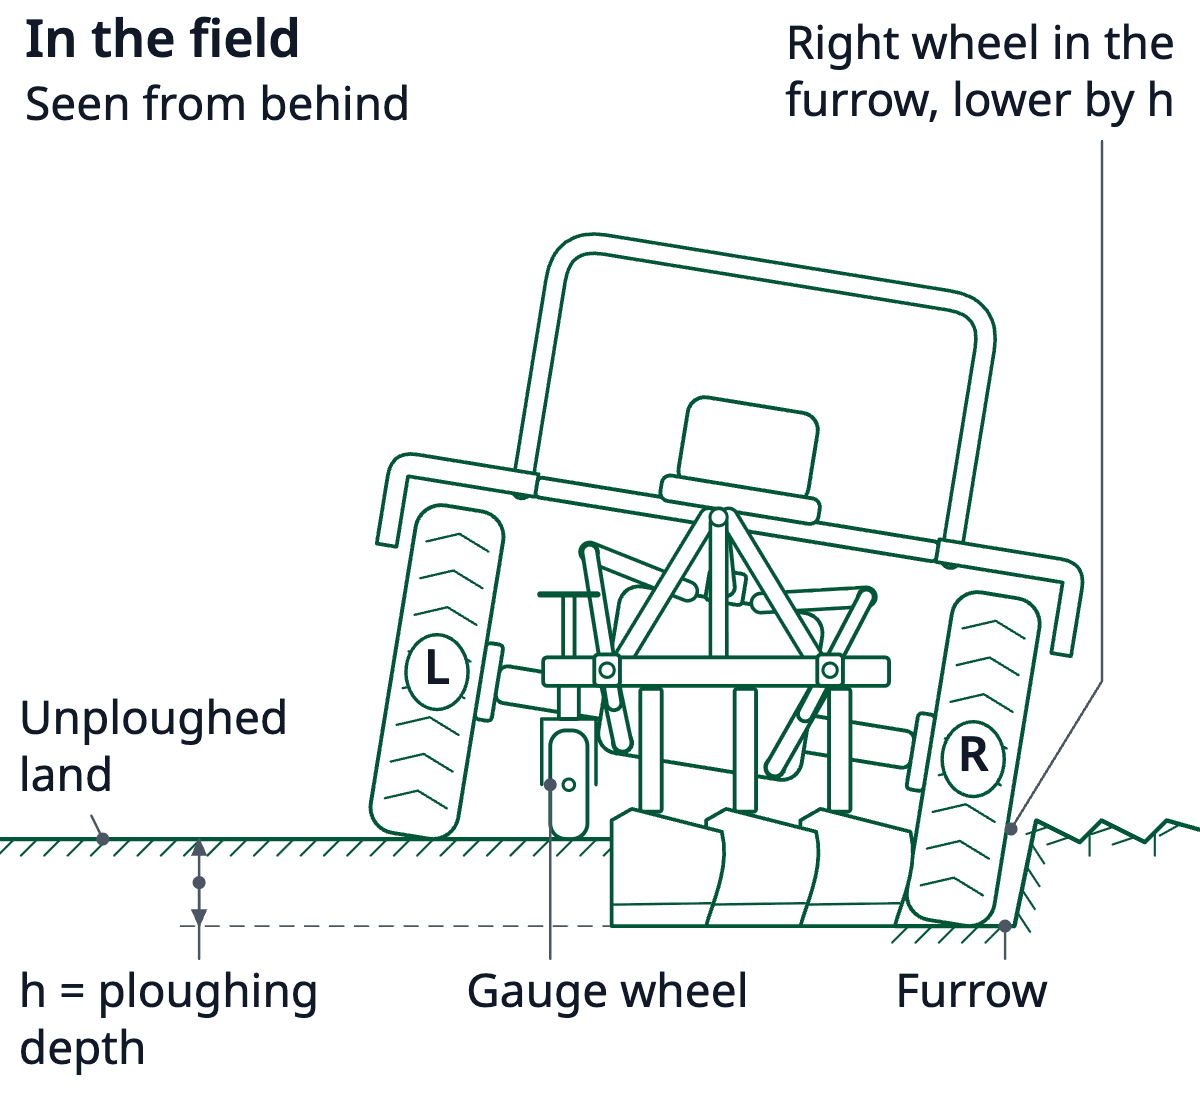
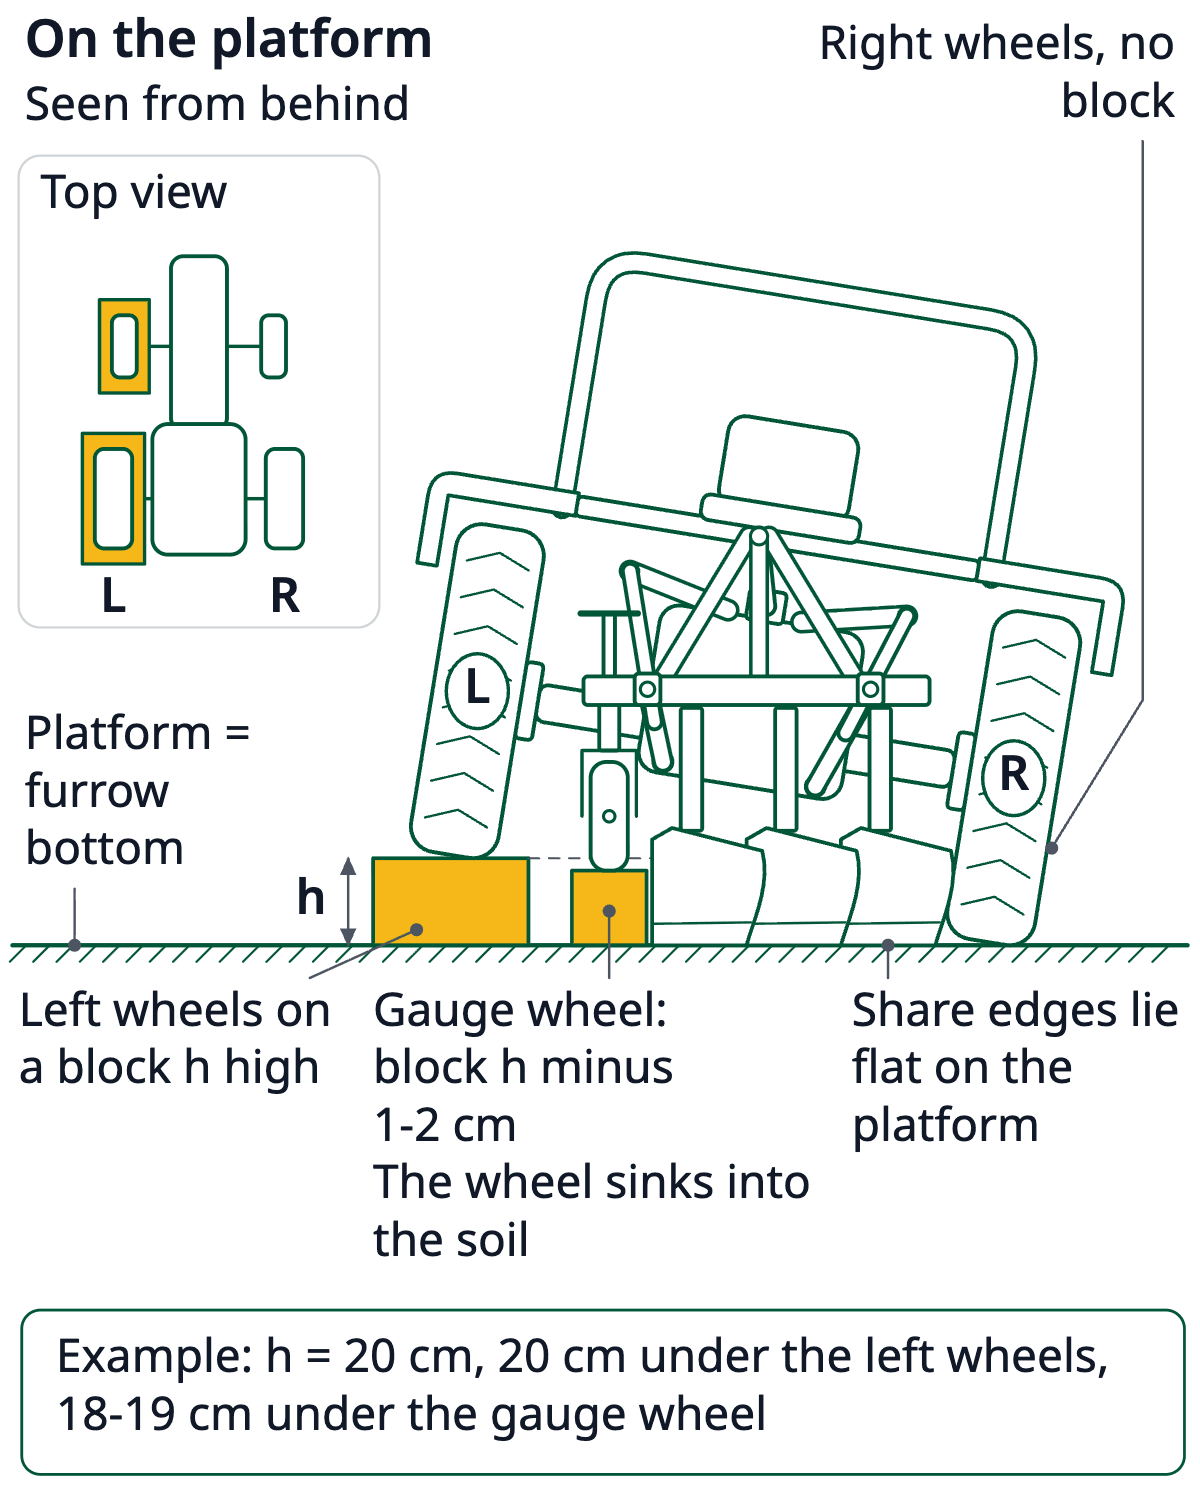
The level ground here stands for the furrow bottom. While ploughing, the tractor's right wheels run in the furrow, lower than the left ones by the ploughing depth. Hence, under the Kirovohrad guide (2015), only the left wheels drive onto a block as high as the ploughing depth. In November 2026, Google's automatic answer to the Ukrainian search «як настроїти плуг до мінітрактора» put the block under the right wheel: the wrong way.
| What goes on a block | Block height | Why |
|---|---|---|
| Tractor's left wheels | the ploughing depth | in the field they run on unploughed land, higher than the right ones |
| Tractor's right wheels | no block | in the field they run on the furrow bottom |
| Plough's gauge wheel | the ploughing depth minus 1-2 cm | the wheel sinks into the soil |
For ploughing at 20 cm, that is a 20 cm block under the left wheels and 18-19 cm under the gauge wheel. Both university guides, Kirovohrad's and Uman's (2020), give the 1-2 cm allowance. Lower the plough with the wheel's screw until the share edges of the front and rear bodies lie tight on the ground; chisel-shaped shares touch it with their points, edges parallel. Depth is finished in the field from the first readings (Kirovohrad guide).
Levelling the frame: right lift rod and top link
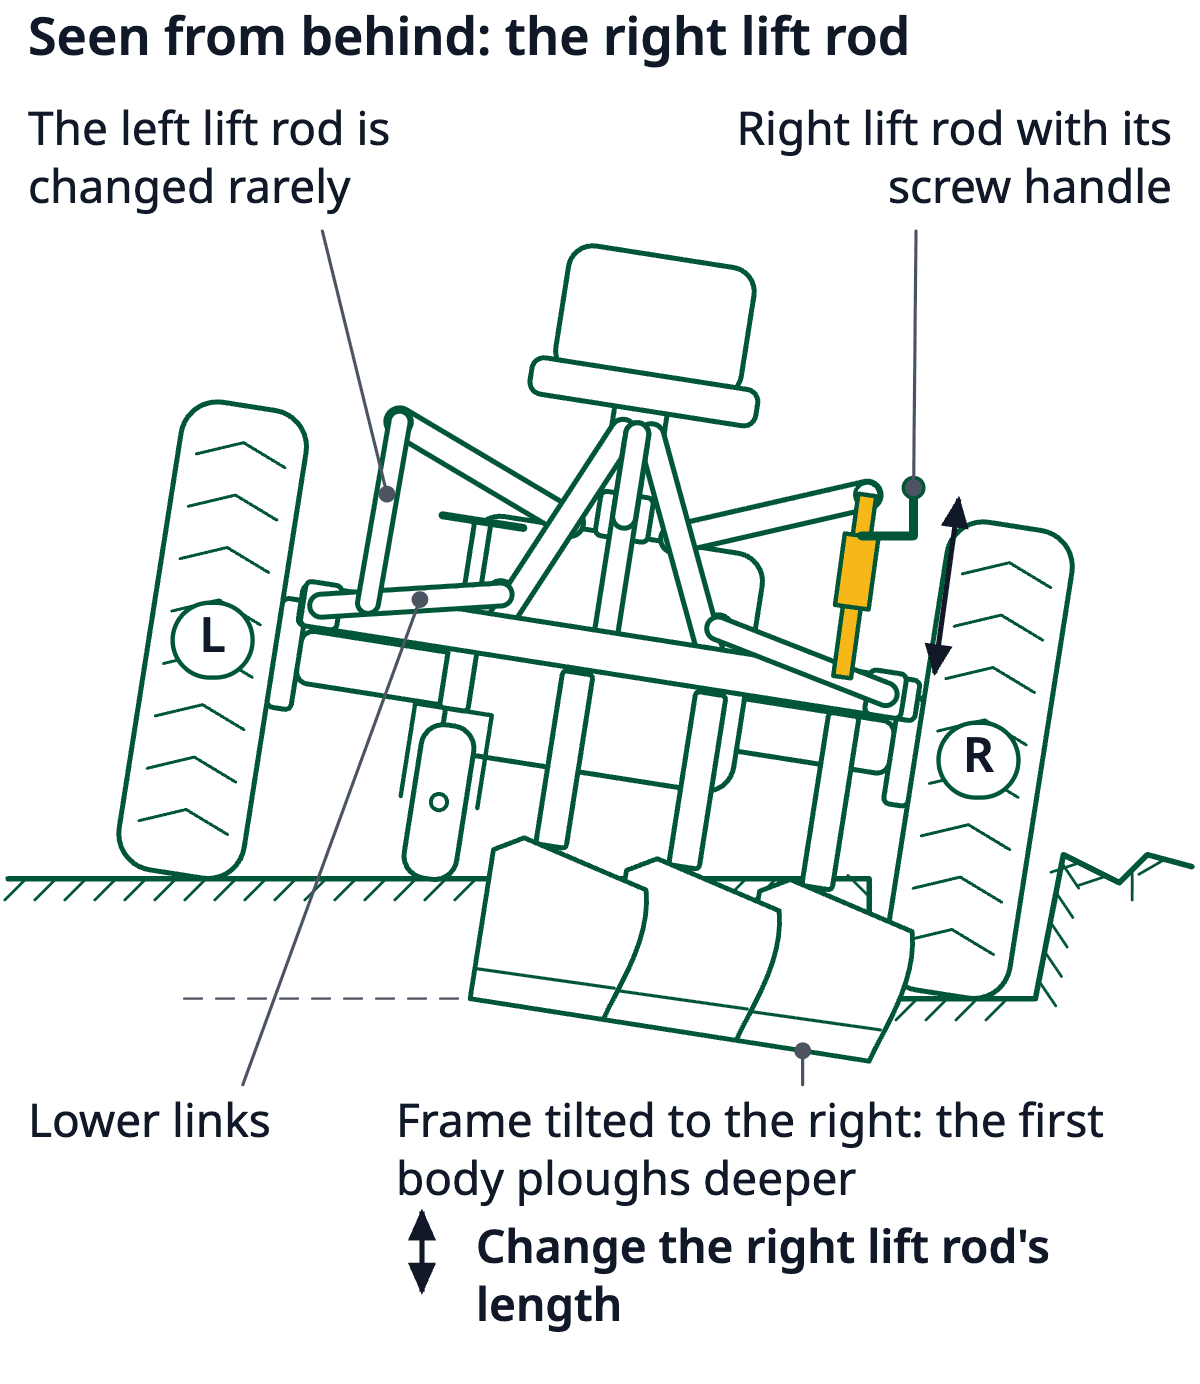
Lowered onto level ground, the plough's frame should stand parallel to it (Uman guide, 2020). Tilt across is corrected by the length of the right lift rod, set with its screw handle (South West Farmer); the left lift rod is changed rarely (Kirovohrad guide, 2015). Pitch is set by the top link: a shorter link tips the frame forward, a longer one back (South West Farmer). A frame tipped forward drives the front bodies deeper and the plough runs on its toes (Uman guide); a frame tipped back brings the plough up out of the ground (Kirovohrad guide). In the field the signs read like this:
| What you see | What to change |
|---|---|
| First body ploughs deeper than the rear ones: the frame is tilted to the right | The length of the right lift rod |
| Front body ploughs shallower than the rear one: the frame is tilted to the left | The length of the right lift rod |
| Front body digs in | Lengthen the top link |
| Front body runs out of the ground, the heel marks the furrow bottom | Shorten the top link |
At work the rule is the same: the frame parallel to the field's surface, levelled across with the right lift rod and lengthwise with the top link (Uman guide).
Hydraulics: float, position or draft
The sources advise different modes, and part of the difference comes from the type of plough:
| Plough | Hydraulics at work | Check chains | Source |
|---|---|---|---|
| Mounted, with a gauge wheel | float, the wheel holds the depth | slack, so the plough floats sideways without touching the tyres | Uman guide (2020); South West Farmer |
| Mounted, without a gauge wheel | draft control, if the tractor has it | slack | South West Farmer |
| Reversible, mounted | draft or mixed control | tight | Kirovohrad guide (2015) |
| Pöttinger SERVO, semi-mounted reversible | position control | tight for transport | Pöttinger manual |
The Belarus 921.6 tractor manual calls draft control the ideal mode for mounted implements working in the soil. For a reversible plough the Kirovohrad guide adds three settings: the top link rises slightly towards the plough, the front of the plough stands 1-3 cm higher than its rear on level ground, and the tractor's rear wheels are 1.3-1.5 m apart. Check the mode in both the tractor's and the plough's manuals. For the automatic systems that watch wheel slip, see the glossary: slip controllera.
The first furrow and the front body's width
The front body must take the same width as the others. On a mounted plough this is corrected by shifting the plough sideways with the linkage check chains or by moving the plough's axle (Uman guide, 2020). Kverneland advises measuring the width of the front furrow and comparing it with the body's. The width depends largely on the wheel track, and small corrections are made by turning the plough's cross shaft (South West Farmer). Some ploughs have a separate width spindle for the first body (Pöttinger manual).
Left and right skew
At work the frame's beams must run parallel to the direction of travel. Otherwise the plough runs skewed and the quality of the ploughing drops sharply. Under the Uman guide (2020), left and right skew do different harm:
| Skew | What goes wrong | What follows |
|---|---|---|
| Left | the angle between the share's edge and the direction of travel narrows, so the slice is turned and loosened worse | deeper furrows behind the bodies, unploughed ground between neighbouring bodies |
| Right | the plough's draft rises sharply and its actual working width narrows | higher fuel and lubricant use, lower output |
On three-body mounted ploughs, skew is corrected with special bolts on the plough's hitch axle, where the plough has them.
Skimmers and the disc coulter
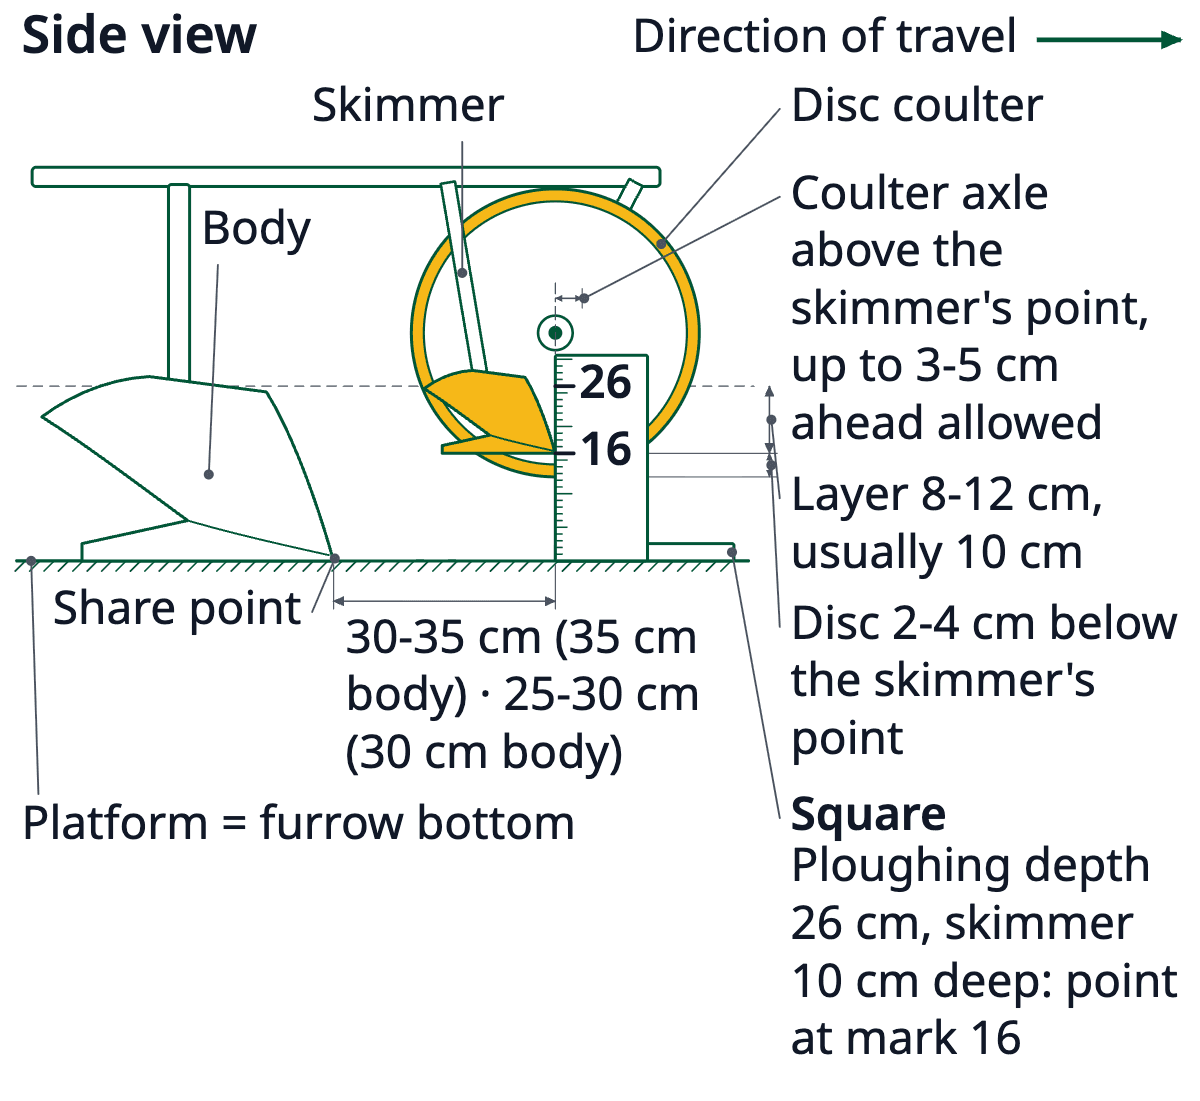
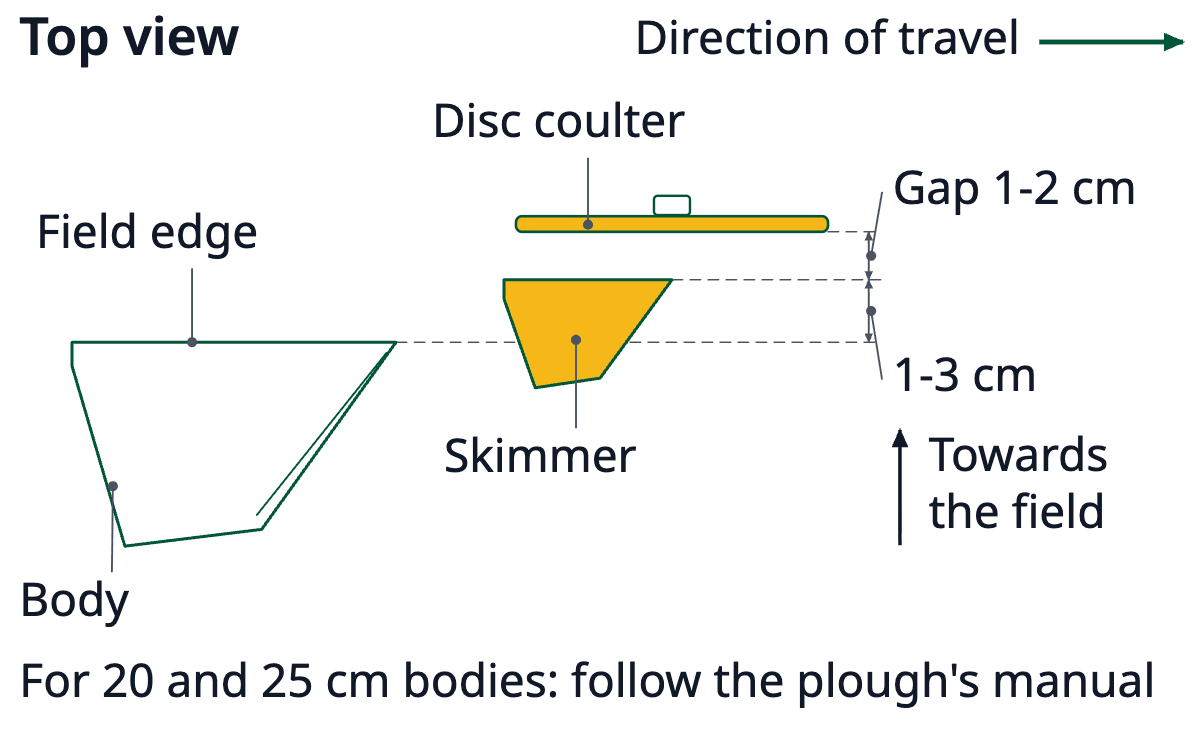
The skimmer cuts a small slice from the field side and drops it into the furrow bottom, so the main body turns its slice better; the disc coulter cuts the slice vertically. The Uman guide (2020) gives their positions for 30 and 35 cm bodies:
| What to set | Limit |
|---|---|
| Skimmer, along the frame | point 30-35 cm ahead of the share point of a 35 cm body, 25-30 cm ahead of a 30 cm body |
| Skimmer, depth | takes a layer 8-12 cm thick, usually 10 cm |
| Skimmer, sideways | its field edge 1-3 cm towards the field from the body's field edge |
| Coulter, along the frame | axle in the vertical plane of the skimmer's point, up to 3-5 cm ahead allowed |
| Coulter, depth | the disc's bottom edge 2-4 cm below the skimmer's share point |
| Coulter, sideways | the disc's plane 1-2 cm clear of the skimmer's field edge |
The skimmer's depth is set with the upright rule of a square: for ploughing at 26 cm with the skimmer working 10 cm deep, its share point should touch the 16th mark. For 20 and 25 cm bodies neither university guide gives figures, and makers advise differently, so take the figures from your plough's manual:
| Source | Skimmer | Disc coulter |
|---|---|---|
| Uman guide (2020), 30 and 35 cm bodies | a layer 8-12 cm thick | 2-4 cm below the skimmer's point |
| Kverneland (2023), its own reversible ploughs | about 2-5 cm deep | 4-10 cm deep, 1-2 cm wider than the furrow |
| South West Farmer | no deeper than a third of the ploughing depth | at least 12 mm above the share |
When the slice is not turned over
The standard is a slice turned over completely (Uman guide, 2020). If the plough leaves it short, check three things that, under the guide, affect how the slice turns. First, left skew, which disturbs the turning of the slice (see above). Second, the skimmer. One goes ahead of every body, and a general-purpose mouldboard turns the slice well precisely when working with it. Third, the mouldboard's shape. For sod the guide advises the semi-digger mouldboard, whose wing is bent further towards the slice.
| Mouldboard | Turns the slice | Loosens | Where it is used |
|---|---|---|---|
| Cylindrical | not enough | well | no longer fitted to tractor ploughs |
| General-purpose | well, with a skimmer | well | long-cultivated and light soils |
| Semi-digger | well | not enough | virgin land, sod |
| Helical | well | not enough | rarely |
PLN-3-35 on an MTZ-80/82 or YuMZ-6
The three-body PLN-3-35 is set up with the same steps, and it is the very plough the Kirovohrad guide (2015) uses for its setup exercise on a test stand: the left wheels on a block as high as the ploughing depth, the gauge wheel 1-2 cm lower, the frame levelled with the right lift rod and the top link.
With tractors of drawbar class 1.4, mounted ploughs work on the three-point scheme (Uman guide, 2020). The same university's practice guide (2019) puts the MTZ-82, YuMZ-8280 and YuMZ-6AKL in that class; the MTZ-80 is not named in the list. Take the hydraulic mode from your own tractor's manual.
The PLN-3-35's bodies are 35 cm wide, so the skimmer goes 30-35 cm ahead of the body's share point, and the other positions come from the table above. Skew on this plough is corrected with the bolts on its hitch axle.
Marking out the field and the first pass
Before ploughing, clear foreign objects from the field or mark them with poles, choose the direction of travel and divide the field into lands, marking the centre line of each with poles. A land's width should be a multiple of the unit's working width, or missed strips are left. A land is ploughed by gathering or by casting:
| Method | Where it starts | What it leaves |
|---|---|---|
| Gathering | in the middle of the land, turning right at the end | a back-furrow ridge in the middle, dead furrows between lands |
| Casting | at the right edge of the land, turning left at the end | a dead furrow in the middle, back-furrow ridges along the edges |
Divide the field into an odd number of lands, gather the odd ones and cast the even ones, and there are half as many furrows and ridges. The headlands are marked first, with a pass of the plough that turns the soil towards the middle of the field. For the first working pass, set the front body to half the depth with the right lift rod, plough the first furrow, then return the lift rod to its working position. Over the next few passes pick the working speed, and if the ploughing is poor, stop and adjust the plough (Uman guide, 2020).
How to check the ploughing
The Uman guide (2020) gives quality indicators for ploughing. Depth is measured with a ruler, a straight bar or a furrow gauge in at least ten places along the field's diagonal, and the evenness of the surface with a rail laid across the slices.
| Indicator | Limit |
|---|---|
| Deviation from the set depth | ±1 cm |
| Furrow straightness | ±1 m per 500 m of run |
| Turning of the slice | full |
| Residue, weeds and fertiliser buried | at least 95 % |
| Height of ridges | up to 5 cm |
| Back-furrow ridges and dead furrows | up to 7 cm |
| Missed strips, unploughed headlands | none |
If the depth is out of tolerance, go back to level ground and check the frame and the wheel again. Depth that differs between bodies points to a tilted frame, and a front body that digs in points to a short top link. How to choose the plough for your tractor is covered in Plough for a compact tractor: sizes, power and hitcha.
Safety when hitching and adjusting
Back up to the plough slowly, so the pins of the plough's axle meet the holes in the lower links. Lock the lower links with their latches, then fit the top link and secure it with its pin, and only then connect the hydraulics (Kirovohrad guide, 2015, for a reversible plough). Use pins of the proper size, with clips (University of Maine, 2018).
- Nobody stands between the tractor and the plough while hitching, and the engine is shut off whenever someone is attaching the plough or working between them (University of Maine, 2018).
- The rules on labour safety in agricultural production, as the State Labour Service's leaflet restates them (March 2024), require the working parts of a raised mounted implement to be changed, cleaned or adjusted only with the unit stopped and braked and the engine off, using special scrapers and wearing gloves.
- Under the same rules, nobody stays within the swing of a mounted machine while the unit turns.
- When checking the shares, make sure the plough is supported and cannot be lowered by accident (South West Farmer).
Sources
- Головатюк А.А. та ін., «Методичні вказівки… Сільськогосподарські машини», частина 1, Уманський НУС (2020) · pmoapv.udau.edu.ua
- Сало В.М., Лузан П.Г., Лещенко С.М., Мачок Ю.В., Лузан О.Р., «Методичні вказівки до виконання практичних робіт… Сільськогосподарські машини», практичні роботи 1 і 2, Кіровоградський НТУ (2015) · dspace.kntu.kr.ua
- Войтік А.В., Шевчук В.В., Кутковецька Т.О., «Методичні вказівки по навчальній практиці… Трактори і автомобілі», Уманський НУС (2019), с. 4 · pmoapv.udau.edu.ua
- Держпраці, Управління інспекційної діяльності у Кіровоградській області, «Безпека під час проведення весняно-польових робіт» (березень 2024) · velykoseverynivska-silrada.gov.ua
- University of Maine Cooperative Extension, Bulletin #2361, Reducing or Eliminating the Hassle of Attaching/Detaching Implements and Trailers (© 2018) · extension.umaine.edu
- Kverneland UK, Arrow straight: how to correctly set up a Kverneland reversible plough (20.11.2023) · uk.kverneland.com
- South West Farmer, How to set a right-handed plough before taking it out in the field (undated) · southwestfarmer.co.uk
- Pöttinger, Operator's manual SERVO 6.50 / PLUS / NOVA / NOVA PLUS, No. 99 9851.GB.80L.0 (undated) · trejon.se
- Belarus 921.6 tractor, operator's manual, p. 57 (undated) · manualslib.com
- TNAU Agritech, Disc plough (© 2016) · agritech.tnau.ac.in
Frequently asked questions
Why won't the plough go into the ground?
Check the share, the top link and the gauge wheel. A blunt share with no gap under its back struggles in hard ground; a top link that is too long lifts the front body and the heel marks the furrow bottom; a gauge wheel set too shallow holds the plough up. For hard, dry ground a chisel-shaped share, a body with a sliding chisel point or a disc plough suits.
Which tractor wheels go on the block?
The left ones. While ploughing, the tractor's right wheels run in the furrow, lower than the left ones by the ploughing depth, so on level ground only the left wheels drive onto a block as high as the ploughing depth (Kirovohrad National Technical University, 2015). The plough's gauge wheel stands on a block 1-2 cm thinner than the ploughing depth.
How do I set up a plough on a compact tractor?
On level ground: equal tyre pressures, the left wheels on a block as high as the ploughing depth, the gauge wheel on a block 1-2 cm lower, the frame parallel to the ground across (right lift rod) and lengthwise (top link), and a full width for the front body. With a gauge wheel, keep the hydraulics in float while ploughing.
How do I adjust a single-furrow plough?
With the same steps as a plough with two or three bodies: if the right wheel runs in the furrow, the left wheels go on a block as high as the ploughing depth and the gauge wheel 1-2 cm lower, and the frame is levelled across and lengthwise until the share point touches the ground. The only body is also the front one, so check its width by measuring the first furrow.
How do I adjust a plough on an MTZ-80?
The adjusters are the same: the left wheels on a block, the right lift rod, the top link and the gauge wheel. The Uman guide notes that with tractors of drawbar class 1.4, mounted ploughs work on the three-point scheme; the same university puts the MTZ-82 in that class. Take the hydraulic mode from your own tractor's manual.
How do I adjust a Bomet plough?
Like any other mounted plough: level the frame with the right lift rod and the top link, set depth with the gauge wheel, give the front body a full width. Take the wheel track and the skimmer depth from the manual for your model.
How far may ploughing depth vary?
±1 cm from the set depth, under the Uman National University of Horticulture guide (2020). Measure in at least ten places along the field's diagonal.